Imagine you are preparing a report that needs to be updated every week. The first page contains a date, the footer displays the page number, and the end of the document includes the word count. Each time, you have to check these values and update them manually.
But what if the document could do some of this work automatically?
That is exactly what fields in LibreOffice Writer are designed for. They allow you to insert information retrieved from the document, such as the current date, time, number of pages, word count, or file name.
Importantly, fields are not ordinary text. They can store specific information and update the values they display.
In this guide, you will learn how to insert fields in LibreOffice Writer, set an automatic date, add a word counter, and control how information is updated.
What Are Fields in LibreOffice Writer?
Fields are special document elements that display specific information.
Instead of manually entering a page number or the current date, you can let the program retrieve the appropriate value.
For example, a field can display:
- Today’s date.
- The current time.
- The page number.
- The total number of pages.
- The number of words in the document.
- The file name.
- Author information.
Some fields update as the document changes. Others can be set to remain fixed.
This makes it easier to prepare documents that require frequent revisions.
How to Insert a Field in LibreOffice Writer
The simplest method is to use the Insert menu.
To add a field:
- Open a document in LibreOffice Writer.
- Place the cursor where you want the information to appear.
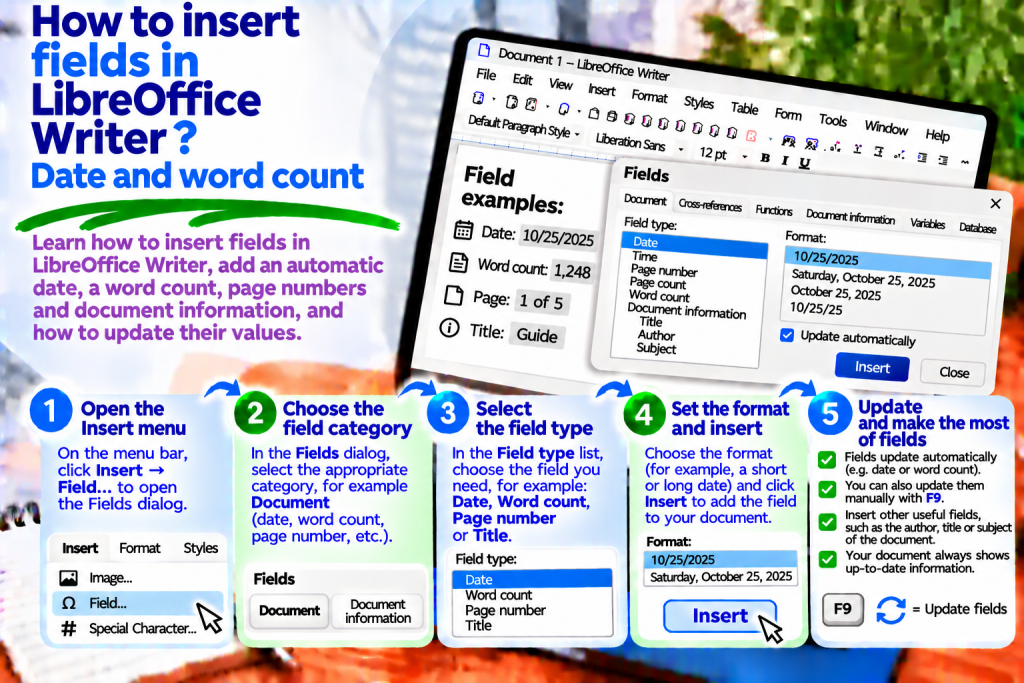
- Select Insert → Field.
- Choose the type of field you need.
- If you need additional settings, select More Fields.
- Specify the type and format of the information.
- Click Insert.
The program will place the selected field in the document.
From that point on, its value will depend on the field type and the settings you have applied.
How to Insert an Automatic Date
An automatic date is useful in reports, working notes, and documents that are regularly updated.
You can configure a field to display the current date.
To do this:
- Place the cursor in the desired location.
- Select Insert → Field → More Fields.
- Open the Document tab.
- From the Type list, select Date.
- From the available options, select Date.
- Choose the display format.
- Click Insert.
Writer will add a date field that can update when you reopen the document or refresh its fields.
This is a convenient solution if you always want to display the current date.
How to Insert a Date That Does Not Change
Not every document should display the current date.
Suppose you are preparing meeting minutes. In this case, the date should represent the day of the meeting, not the day the file is reopened.
Therefore, it is worth using a fixed date.
Open Insert → Field → More Fields.
Then go to the Document tab and select the Date type.
From the available options, choose Date (fixed).
After confirming, Writer will insert a date that will not automatically change to the current date.
This allows the document to preserve the correct information about when it was prepared.
Fixed Date or Automatic Date: Which Should You Choose?
It all depends on the purpose of the document.
| Field Type | Best Use |
|---|---|
| Automatic date | Current reports, working documents, regularly updated summaries |
| Fixed date | Meeting minutes, official letters, confirmations, archival documents |
If the date should indicate when the document was opened or updated, choose a variable field.
However, if the document needs to preserve the date of a specific event, use a fixed field.
This is a small difference in settings, but it is very important when working with the document later.
How to Change the Date Format
Not every document requires the same date format.
For example, you can use:
18.11.2026
or:
November 18, 2026
To change the format, open the date field settings.
Then find the Format section.
Choose one of the available date formats.
If you need more detailed settings, use the additional formatting options.
This allows you to match the date’s appearance to the type of document.
How to Insert the Current Time
Just like the date, you can also insert the time.
This is useful when preparing technical reports, meeting minutes, and notes.
First, place the cursor in the appropriate location.
Then select Insert → Field → More Fields.
On the Document tab, find the Time type.
Choose either a variable or fixed time.
After confirming, Writer will display the appropriate value.
This means you do not have to enter the time manually.
How to Insert a Word Count into a Document
This is one of the most useful features for people preparing articles, academic papers, and reports.
Suppose your document needs to include information about its length.
Instead of manually checking the word count and copying the result, you can insert the appropriate field.
Follow these steps:
- Place the cursor where you want the counter to appear.
- Select Insert → Field → More Fields.
- Open the Document tab.
- From the Type list, select Statistics.
- From the available options, choose Words.
- Click Insert.
Writer will insert a field showing the number of words in the document.
You can add ordinary text before it, for example:
Word count:
This creates a clear indication of the document’s length.
Does the Word Count Update Automatically?
The word count field uses the document’s statistics.
However, after adding more paragraphs, its displayed value may need to be refreshed.
Therefore, it is worth remembering this shortcut:
F9
Pressing it updates the document’s fields in Writer.
This allows the counter to display the current word count.
It is especially worth doing this before printing or sending the completed file.
How to Check the Word Count Without Inserting a Field
You do not always need to place a word counter directly in the document.
If you only want to check the length of the text, use the status bar.
At the bottom of the Writer window, you will find information about the word count.
You can also select:
Tools → Word Count
The program will display detailed statistics, including the number of words and characters.
If you select a section of text first, you can check the statistics for that selection.
However, remember that a document statistics field is not the same as a counter for the currently selected text.
How to Insert the Total Number of Pages
In reports and longer documents, information about the total number of pages is also useful.
For example, you can place it in the footer.
To add this field, select Insert → Field → More Fields.
Then open the Document tab.
In the list of field types, find Statistics.
Select the option for the number of pages and click Insert.
Writer will display the appropriate value.
This means you do not have to correct it every time you add another paragraph.
How to Add the Current Page Number
The page number is one of the most commonly used types of fields.
You can place it in the header, footer, or another part of the document.
First, place the cursor in the appropriate area.
Then select Insert → Field → Page Number.
Writer will insert the current page number.
If you add more pages, the numbering will reflect their positions in the document.
This is particularly useful when creating theses, reports, and instruction manuals.
How to Display the Page Number and Total Number of Pages
Sometimes you want to display:
Page 3 of 12
You can create this using two fields.
First, type the word Page.
Then insert the current page number field.
Add the ordinary text of.
Finally, insert the total number of pages field.
This creates information that automatically adjusts to changes in the document.
It is a very convenient solution for footers in longer documents.
How to Insert the File Name
When preparing technical documentation, it can sometimes be useful to display the current file name.
This makes it easier to identify the document after printing it.
To insert the file name:
- Select Insert → Field → More Fields.
- Open the Document tab.
- Select the File Name type.
- Choose how the name should be displayed.
- Click Insert.
You can display just the file name or additional information about its location, depending on the selected format.
However, remember that the file name may need to be updated after saving the document under a different name.
How to Insert the Document Author
Writer also allows you to use information about the user.
You can use it to display the document’s author.
Open Insert → Field → More Fields.
Then, on the Document tab, select the Author type.
Choose the appropriate option and confirm.
Remember that the contents of this field depend on the user information saved in LibreOffice settings.
Therefore, before sharing the document, check that the displayed information is correct.
How to Insert Fields in a Header or Footer
Fields are particularly useful in elements that repeat on subsequent pages.
For example, you can place the document name in the header.
In the footer, you can include the page number and date.
First, enable the appropriate header or footer in the page style settings.
Then click inside that area.
Insert the required fields using Insert → Field.
This allows the information to appear on pages that use the corresponding style.
How to Update All Fields in LibreOffice Writer
While editing a document, some values may change.
Therefore, it is worth refreshing the fields before finishing your work.
The simplest method is to press:
F9
Writer will update the appropriate fields in the document.
However, remember that fixed fields do not change their values simply because an update has been performed.
This allows you to safely use fixed dates in archival documents.
Why Isn’t a Field Showing the Current Value?
First, check whether the field is variable or fixed.
If you inserted a fixed date, its value will not automatically change to the current date.
Then press F9 to refresh the fields.
If the problem involves the word count, also check the document statistics under Tools → Word Count.
This will help you determine whether the problem is caused by the field update or the counting method itself.
How to Edit an Existing Field
You do not always have to delete a field and insert it again.
If you want to change its settings, click the appropriate element.
Then open the context menu and select the field editing command, if available.
You can also use Edit → Fields after placing the cursor inside the appropriate field.
Different settings will be available depending on the field type.
For example, this allows you to change the date format without rebuilding the document.
Why Do Fields Have a Gray Background?
After inserting a field, you may notice a light gray highlight.
This does not indicate a formatting error.
Writer uses shading to distinguish fields from ordinary text.
If you want to hide it, select:
View → Field Shadings
You can also use the shortcut:
Ctrl + F8
Field shading is an editing aid and is not an ordinary background color applied to printed text.
This allows you to identify fields easily without affecting the printed document’s appearance.
How to Display Field Names Instead of Values
Sometimes you may want to check which fields are present in a document.
Writer allows you to switch between field names and their contents.
Select:
View → Field Names
You can also use the shortcut:
Ctrl + F9
This makes it easier to recognize whether an element is ordinary text or a field.
After checking, you can return to the standard view.
How to Convert a Field to Ordinary Text
Sometimes you may want to preserve a field’s current value without allowing further automatic updates.
For example, the document may be ready for archiving and should retain its existing contents.
In this case, you can select the appropriate field and use the command for converting a field to text, available in the Edit menu.
However, remember that after conversion, the value will no longer be a field.
Therefore, Writer will no longer update it.
It is best to perform this operation only when you are certain that further automatic updates will not be necessary.
Do Fields Work After Saving a Document as PDF?
Yes, but there is an important difference to remember.
When exporting a document to PDF, the visible value of a field is represented as page content.
However, you should not expect an ordinary date or word count field to be automatically recalculated by a PDF viewer.
Therefore, it is worth pressing F9 before exporting.
Then check the date, page numbering, and statistics.
Only afterward should you select File → Export As → Export as PDF.
This ensures that the finished document contains the correct information.
Most Common Mistakes When Using Fields
One common mistake is choosing an automatic date in a document that should preserve its creation date.
Another problem is manually entering the number of pages or words.
Such values quickly become outdated.
It is also important to remember to refresh fields before saving the final version of a document.
Additionally, field shading should not be confused with ordinary text formatting.
Understanding these principles will help you avoid unnecessary corrections.
What Is the Fastest Way to Insert Fields in LibreOffice Writer?
If you need a simple field, open Insert → Field and select the appropriate information.
For more advanced settings, use More Fields.
On the Document tab, you will find options including date, time, file name, and statistics.
After inserting a field, you can customize its format.
To refresh the values, press F9.
This allows you to prepare a document that requires fewer manual updates.
Fields in LibreOffice Writer help automate everyday document tasks.
They allow you to insert the current date, time, page number, total number of pages, word count, and file information.
The most important feature is Insert → Field → More Fields, which provides detailed settings.
It is also worth remembering the F9 shortcut because it allows you to update field values.
If you are preparing an archival document, remember that you can use a fixed date.
For reports and materials that are regularly edited, variable fields are a better choice.
With these features, Writer can automatically display information that would otherwise have to be updated manually.