A product photo, installation diagram, screenshot, or company logo can convey more than several paragraphs of text. However, problems begin when adding an image suddenly changes the document layout, moves the text to the next page, and the image refuses to stay in the selected position.
In LibreOffice Writer, you can not only insert a picture but also control its size, position, and how text wraps around it. What’s more, the program allows you to add captions, crop images, and save documents with embedded images.
In this guide, you will learn how to insert an image in LibreOffice Writer, position it correctly, and avoid the most common formatting problems.
How to Insert an Image in LibreOffice Writer
The simplest method is to select a file saved on your computer.
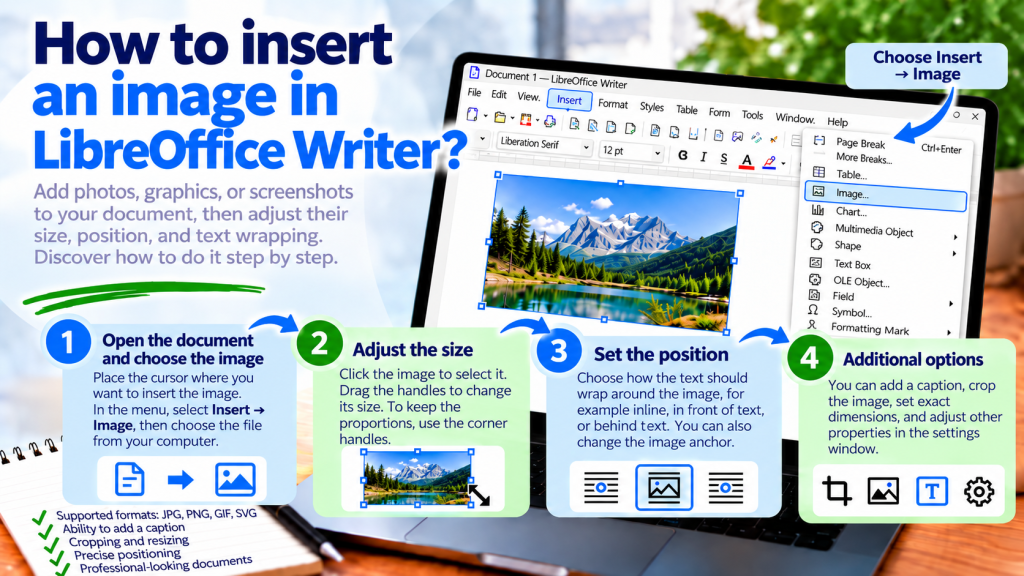
To add an image, follow these steps:
- Open the document in LibreOffice Writer.
- Place the cursor where you want to insert the image.
- From the top menu, select Insert → Image.
- Find the appropriate file on your computer.
- Select the image and click Open.
Writer will insert the image into the document. You can then adjust its size and position relative to the text.
Remember that the position of an image also depends on its anchoring. Therefore, an image does not always behave exactly like an ordinary text character.
Which Image Formats Does LibreOffice Writer Support?
Writer allows you to work with popular image formats.
The most commonly used formats include:
- JPG and JPEG: suitable for photographs and product images.
- PNG: suitable for screenshots, icons, and graphics with transparency.
- GIF: useful for simple graphics.
- SVG: a vector format that works well for icons and diagrams.
The choice of format matters. For example, a screenshot containing text will usually be more readable as a PNG than as a heavily compressed JPG.
Photographs, on the other hand, often take up less space when saved in JPEG format.
How to Insert a Picture Using Drag and Drop
You do not have to use the Insert menu every time.
If you have a folder containing pictures open, you can drag a file directly into the document.
First, open the folder containing the image. Then click and hold the file with the left mouse button and drag it into the Writer window.
When you release the button, the program may insert the image into the document.
This makes adding several images much faster.
However, remember that drag-and-drop behavior may depend on the operating system and how the operation is performed.
How to Paste an Image from the Clipboard
Another method is particularly useful when preparing instructions with screenshots.
Suppose you have taken a screenshot of part of the screen and want to insert it directly into the document.
First, copy the image to the clipboard. Then switch to LibreOffice Writer and place the cursor in the appropriate location.
Use the shortcut:
Ctrl + V
The program will paste the clipboard contents into the document.
This means you do not have to save each screenshot as a separate file beforehand.
However, if you want more control over the format of the pasted content, you can use Paste Special.
How to Insert Multiple Images into a Document
When creating a catalog, report, or set of instructions, you often need more than one picture.
You can add additional images using Insert → Image.
Then position them in the appropriate places in the document.
If the images are intended to form an organized gallery, consider using a table without visible borders.
This makes it easier to maintain even spacing between pictures.
However, remember that the table serves as a document layout element rather than a tool for editing the images themselves.
How to Resize an Image in LibreOffice Writer
After inserting a picture, you may find that it takes up too much space.
Fortunately, you do not need to prepare a new image file.
Click the image to select it. Handles will appear around the image, allowing you to resize it.
Then drag the appropriate handle.
If you want to maintain the correct proportions, it is best to use the corner handles and check the aspect ratio settings.
This prevents the picture from becoming unnaturally stretched.
How to Set the Exact Width and Height of an Image
Dragging handles is convenient, but it is not always precise enough.
If you are preparing a professional document, you can specify the exact dimensions of the image.
Right-click the image and open its properties.
Then find the size settings.
You can specify the width and height of the image there.
It is also worth enabling the option to maintain the aspect ratio so that changing one dimension automatically adjusts the other.
This allows several images to have exactly the same width.
How to Move an Image to Another Position in the Document
After adding an image, you can try moving it with the mouse.
Click the image and drag it to the desired location.
However, the result depends on the anchoring and text wrapping settings.
If the image refuses to move where you want it, do not try to fix the situation by adding empty paragraphs.
Instead, check the position and anchoring settings.
These determine how the image is connected to the document.
What Does Image Anchoring Mean?
Anchoring determines which element of the document an image is associated with.
Writer provides different anchoring methods. Depending on the situation, you can anchor an image to a page, paragraph, or character, or place it as a character.
Each option works well in different situations.
For example, an image anchored to a paragraph remains associated with a specific section of text.
An image placed as a character, on the other hand, behaves similarly to a large character within a line.
How to Set an Image as a Character
This is one of the most convenient solutions when creating simple instructions.
Right-click the image.
Then go to Anchor and select As Character.
Writer will then treat the image as an element placed within the text.
This allows the image to move together with the corresponding section of the document.
This solution works well for icons, small illustrations, and screenshots placed between paragraphs.
How to Position an Image Next to Text
You do not always want a picture to occupy the entire width of the page.
Sometimes it is better to place it on the left or right, leaving room for text.
To do this, select the image and open the text wrapping settings.
Then choose the arrangement that matches your intended layout.
Writer can then place text next to the image.
This makes it easier to prepare a flyer, informational material, or illustrated document.
How to Enable Text Wrapping Around an Image
Text wrapping determines how text behaves near an image.
To change the setting, right-click the image and go to Wrap.
Depending on the selected option, text can appear beside the image, above and below it, or in another arrangement.
It is worth trying several settings because each produces a slightly different result.
If you are creating instructions with screenshots, placing text above and below the image will often be the clearest option.
For promotional materials, wrapping text around the sides may be useful.
How to Set the Spacing Between an Image and Text
Even correctly configured text wrapping can look poor if the text is too close to the picture.
Therefore, it is worth adding appropriate spacing.
Open the image properties and go to the wrapping settings.
Then check the available fields that determine the distance between the image and the text.
You can adjust the spacing on individual sides.
This makes the document easier to read and prevents the text from touching the edges of the picture.
How to Center an Image in LibreOffice Writer
If the image is set as a character, you can use paragraph alignment.
First, click the paragraph containing the image.
Then use the shortcut:
Ctrl + E
Writer will center the paragraph contents.
This is a convenient method when preparing instructions in which screenshots should be centered on the page.
However, if the image is a freely positioned object, its alignment should be controlled through the position settings.
How to Align an Image to the Left or Right
The alignment method depends on the anchoring.
If the image is placed in a paragraph as a character, you can use standard text alignment.
For freely positioned images, however, it is better to use the position properties.
This gives you more precise control over where the image appears on the page.
It is also worth checking text wrapping because simply moving the image does not always produce the expected layout.
How to Crop an Image in LibreOffice Writer
Sometimes a picture contains unnecessary sections.
These may include an empty background, an unwanted part of the screen, or an element you do not want to show.
You do not need to open a separate image editor immediately.
Select the image and use the cropping function available in the image tools.
Then adjust the visible area of the image.
This allows you to keep only the most important part.
However, remember that cropping an image within a document does not always mean permanently removing the hidden image data.
How to Rotate an Image
If a picture has been inserted with the wrong orientation, you can rotate it.
Select the image and use the available rotation tools.
Depending on the image type and program version, you may also be able to use the properties settings.
This allows you to correct the picture’s orientation without having to insert the file again.
How to Add a Caption Below an Image
Captions are particularly useful in reports, instructions, and academic papers.
Suppose you are adding a screenshot showing the program’s settings window.
Instead of leaving the image without a description, you can add a caption:
Illustration 1. LibreOffice Writer Settings Window
To do this, select the image and use the Insert Caption command, which is available, among other places, in the context menu.
Then choose the caption category and enter the appropriate text.
This makes the document more organized.
How to Automatically Number Images
Manually entering illustration numbers can cause problems.
If you later add a new image between existing ones, you will need to correct the subsequent numbers.
Therefore, it is worth using Writer’s caption feature.
The program can automatically number illustrations.
This makes it easier to maintain the correct sequence even in a complex document.
What’s more, properly prepared captions can later be used when creating a table of figures.
How to Add Alternative Text to an Image
Alternative text describes the contents of an image and helps improve document accessibility.
It is particularly important when an image conveys essential information.
Right-click the image and open its properties.
Then find the accessibility or alternative description settings, depending on your version of LibreOffice.
Enter a short description presenting the most important content of the image.
For example, for a screenshot, you can use:
LibreOffice Writer window with the Insert menu open and the Image command selected.
This allows someone using a screen reader to receive information about the meaning of the image.
How to Insert an Image Without Losing Quality
Image quality depends primarily on the source file.
If you insert a very small picture and enlarge it significantly, the image may become blurry.
Therefore, it is best to use files with an appropriate resolution.
For screenshots, it is worth preserving the original sharpness of the text.
For photographs, avoid repeatedly saving the file with heavy compression.
Also remember that enlarging an image in Writer does not increase the amount of detail stored in the original file.
How to Reduce the Size of a Document with Pictures
A large number of photographs can significantly increase the document’s file size.
For example, a dozen pictures of several megabytes each can make the file inconvenient to send.
Therefore, before inserting images, it is worth checking their actual dimensions and file sizes.
You can also use the image compression feature if it is available in your version of the program.
This allows you to reduce the document size without removing illustrations.
However, it is worth keeping the original image files because excessive compression can reduce quality.
How to Insert an Image as a Link to a File
When inserting an image, Writer may provide a Link option.
If you select it, the document will refer to an external file instead of storing a normal embedded copy of the image.
This solution can be useful when the source image is updated regularly.
However, it has an important disadvantage.
If you move the document to another computer without the corresponding image file, the image may no longer be available.
Therefore, embedding images is usually safer for documents intended to be sent to others.
What Is the Difference Between an Embedded and a Linked Image?
An embedded image is stored inside the document.
This makes the file easier to move and share.
A linked image, on the other hand, uses a reference to an external file.
As a result, changes to the source image may become visible when the document is reloaded.
However, this solution requires continued access to the original file.
If you are preparing instructions, an assignment, or a report for another person, embedding the image will usually be more convenient.
How to Save a Document with Images
After finishing your edits, save the document using:
Ctrl + S
If you are using LibreOffice’s native format, you can save the file as ODT.
This allows you to continue editing the document in Writer.
If the recipient uses Microsoft Word, you can consider saving the document in DOCX format.
However, it is worth checking the image layout after saving and reopening the document because different programs may interpret object positions slightly differently.
How to Save a Document with Images as a PDF
If the document is ready to share, PDF will often be a good choice.
First, check the position of all images.
Then select:
File → Export As → Export as PDF
In the export window, you can adjust the available settings.
After saving, open the finished PDF and check whether all images are in the correct positions.
This will help you avoid sending a document with accidentally displaced illustrations.
Why Does an Image Move While Typing?
This is one of the most common problems when working with images.
It is usually caused by the image anchoring method and text wrapping settings.
If an image is associated with a paragraph, its position may change as the document layout changes.
Therefore, check the anchoring first.
For simple instructions, As Character is often a convenient option.
For more complex page layouts, however, it is worth carefully choosing the positioning method.
Why Does Text Overlap an Image?
This problem may occur because of inappropriate wrapping or positioning settings.
First, select the image and check the text wrapping options.
Then choose the option that matches your intended layout.
If the text is still too close to the image, increase the spacing in its properties.
This will restore a readable document layout.
Why Does an Image Not Fit on the Page?
An oversized image may extend beyond the available document area.
In this situation, check its width and height.
Then reduce its size while maintaining the aspect ratio.
It is also worth considering the page margins.
If the document uses A4 paper, the available text width is smaller than the total width of the page.
Therefore, it is best to fit the image within the area between the margins.
Why Is an Image Blurry?
The problem is usually caused by the original file having insufficient resolution.
If you enlarge a small image significantly, details may become blurred.
Therefore, it is best to insert an image with appropriate dimensions.
For screenshots, it is also worth avoiding unnecessary scaling.
If the image contains small text, check its readability at the actual page zoom level.
How to Remove an Image from a Document
If an image is no longer needed, click it to select it.
Then press:
Delete
Writer will remove the selected image.
If you accidentally delete the wrong element, you can use:
Ctrl + Z
This will undo the last operation.
How to Replace an Image with Another One
Sometimes you want to replace a picture while keeping a similar document layout.
You can use the image replacement feature available in the appropriate context menu or image tools.
Then select the new file.
After replacing it, check the size, proportions, and position.
The new image may have different dimensions from the previous one, so you may sometimes need to adjust its appearance again.
How to Arrange Images in Instructions
When creating guides, readability is the most important consideration.
A screenshot should be placed as close as possible to the paragraph describing the action it illustrates.
This means the reader does not have to search for the corresponding illustration on the next page.
It is also worth using captions, especially when the document contains many images.
In addition, all screenshots should have a similar width if they show comparable interface elements.
This makes the document look more professional.
Most Common Mistakes When Inserting Images
The first mistake is enlarging very small pictures. As a result, the image becomes blurry.
Another problem is accidentally changing the aspect ratio. Therefore, when scaling an image, it is worth checking the relationship between its width and height.
You should also avoid positioning images using multiple empty paragraphs and spaces. Instead, use anchoring, wrapping, and position settings.
In addition, before sharing the document, check whether all images are embedded or whether the recipient will have access to the linked files.
What Is the Fastest Way to Insert an Image in LibreOffice Writer?
If you simply want to add a picture to a document, only a few steps are needed.
Open Writer and place the cursor in the appropriate location.
Then select Insert → Image and choose the image file.
After inserting it, adjust its size.
If the image should appear between paragraphs and move with the text, consider using As Character anchoring.
Finally, check the page layout and save the document.
Inserting images in LibreOffice Writer is simple, but positioning them correctly requires understanding a few additional features.
The most important settings are size, anchoring, and text wrapping. These determine how a picture behaves during later document editing.
With the ability to crop images, change their dimensions, and add captions, you can prepare clear instructions, reports, and informational materials.
It is also worth remembering the difference between embedded and linked images. If you intend to send the document to another person, it is usually better to keep the image directly in the file.
Ultimately, a well-placed image should complement the content rather than make it harder to read. Therefore, before saving the document, check both the image quality and its position relative to the text.