Imagine a training plan. At first, you have three main topics, but each of them quickly expands to include additional subjects. Exercises, examples, and additional information appear beneath them. A simple list is no longer enough because all the items look as if they have the same level of importance.
This is exactly where multilevel lists in LibreOffice Writer come in handy. They allow you to create main items, subitems, and additional levels of nesting. This makes the structure of the document visible at a glance.
Importantly, you do not have to manually add spaces before each subitem. Writer has its own mechanisms for changing list levels, so the entire structure can easily be modified later.
What Is a Multilevel List?
A multilevel list contains items at different levels of a hierarchy.
The simplest example might look like this:
1. LibreOffice Writer
1.1 Text Formatting
1.2 Tables
1.3 Lists
2. LibreOffice Calc
2.1 Formulas
2.2 Charts
2.3 Data Sorting
Writer and Calc are the main topics here. Text formatting, tables, and formulas are subordinate items.
This means the reader does not have to guess the relationships between individual items.
When Should You Use Nested Lists?
Multilevel lists work well wherever information has a parent-child structure.
You can use them when creating a project plan, instructions, a training program, a feature list, educational materials, or technical documentation.
For example, you may be preparing a list of program features:
• Writer
○ text formatting
○ creating tables
○ inserting images
• Calc
○ formulas
○ charts
○ data filtering
In this case, you do not need numbers. However, it is still useful to show which features belong to Writer and which belong to Calc.
How to Create a Multilevel List in LibreOffice Writer
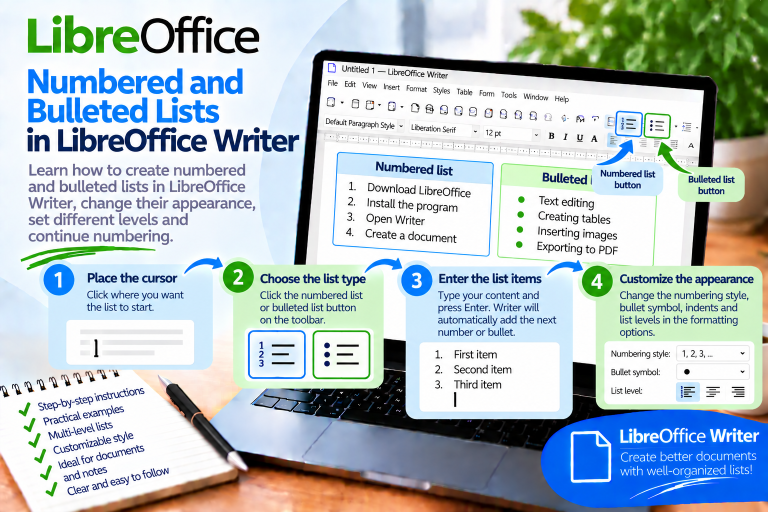
First, create a regular numbered or bulleted list.
Enter the first item and press Enter. Writer will create the next item.
Suppose the first item is:
1. LibreOffice Writer
After pressing Enter, the next list item will appear.
If it should be a subitem of the first item, change its level. Writer will then treat it as a subordinate item.
Next, enter its content.
As a result, you will have a structure consisting of a main item and a subitem.
How to Create a Subitem Using the Keyboard
The keyboard is very convenient when working with lists.
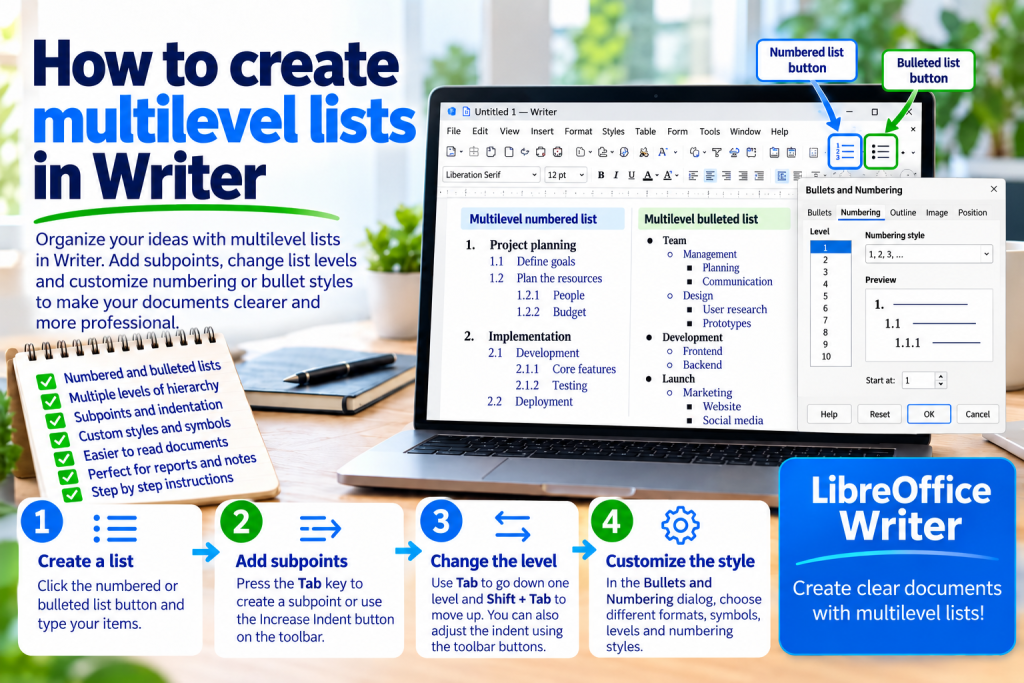
Create a new list item and then use:
Tab
Writer can move the current item to a lower level.
If the list levels are configured appropriately, the appearance of the number or bullet will also change.
This means you do not have to move the text manually.
How to Return to a Higher Level
After creating several subitems, you will probably want to return to the main list.
To do this, use:
Shift + Tab
The current item will be moved up one level.
If it was a second-level item, it can become a main list item again.
In practice, using Tab and Shift + Tab together allows you to build a document structure very quickly.
How to Create Several Subitems
Suppose the main item is:
1. LibreOffice Writer
Now you want to add three topics:
text formatting
tables
images
After creating the first subitem, enter its content and press Enter.
Writer will create another item at the same level.
This allows you to create:
1. LibreOffice Writer
1.1 Text Formatting
1.2 Tables
1.3 Images
After the last subitem, you can return to the main level and start the next topic.
How to Create a Third List Level
A list does not have to end with just one level of subitems.
For example, you have:
1. Writer
1.1 Tables
Under Tables, you want to add even more detailed topics.
It might look like this:
1. Writer
1.1 Tables
1.1.1 Inserting a Table
1.1.2 Merging Cells
1.1.3 Sorting Data
To do this, create another item and then move it down another level.
Writer therefore allows you to build much more complex hierarchies.
Can Each Level Look Different?
Yes. This is one of the most important advantages of multilevel lists.
The first level can use numbers:
1
2
3
The second level can use letters:
a
b
c
The third level can use Roman numerals:
I
II
III
This makes it easier for the user to recognize the position of an item within the overall structure.
Can You Combine Numbering and Bullets?
In many documents, this is a very practical solution.
Main items can be numbered, while detailed information can use bullets.
For example:
1. LibreOffice Writer
• text formatting
• tables
• images
2. LibreOffice Calc
• formulas
• charts
• filters
This keeps the main sequence visible while subordinate items do not suggest an additional order.
How to Change the Appearance of a Specific Level
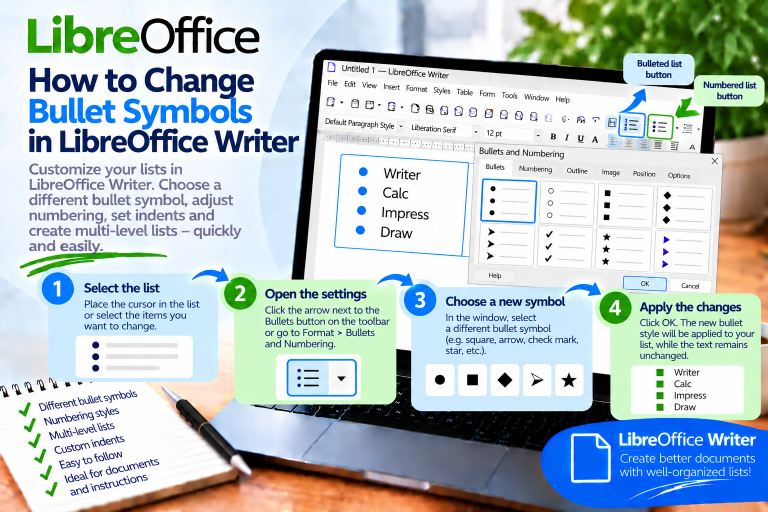
If the standard layout does not suit your needs, open the settings related to bullets and numbering.
Then select the level you want to modify.
You can customize the numbering style, bullet type, and position of the elements, among other things.
As a result, the first level can look completely different from the second.
However, it is worth remaining consistent. If all subitems of the same type have the same meaning, they should also look similar.
How to Change the Bullet Only on the Second Level
Suppose the first level uses a solid circle:
● Writer
while the second level should use an empty circle:
○ text formatting
○ tables
○ images
In the list settings, select the level corresponding to the subitems. Then assign the appropriate bullet symbol to it.
This means you do not have to manually change the symbol for every item.
What’s more, new subitems can retain the same appearance.
How to Change Numbering on Only One Level
You can use a similar approach with a numbered list.
For example, the first level uses standard numbers:
1
2
3
The second level can use letters:
a
b
c
The third level can use a different numbering style.
This solution works particularly well in complex instructions and plans.
How to Change Subitem Indentation
Each subsequent level should be visually offset from the previous one. This makes the hierarchy easier to recognize.
However, this does not mean that you should press the space bar several times.
Writer allows you to control the position of the number, bullet, and text using the list settings.
If subitems are too far from the left margin, reduce their indentation. If the difference between levels is barely visible, you can increase it.
Why Should You Avoid Creating Subitems with Spaces?
Manually adding spaces does not create a real list level.
The text may appear indented, but Writer may still treat it as an ordinary item at the same level.
In addition, such a layout can easily change after applying a different font or changing the page width.
Therefore, use the list level mechanism. This will keep the document easier to edit.
How to Move an Existing Item to a Lower Level
You do not have to know the final structure of the document from the beginning.
If an existing item should become a subitem, place the cursor in it or select the appropriate section.
Then change the list level.
Writer will move the item and apply the formatting assigned to the new level.
This allows you to correct the structure even after writing the entire list.
How to Move Several Items at Once
Sometimes several consecutive items should appear under one main item.
In this case, select the appropriate items and change their level.
This avoids having to modify each item separately.
Before performing the operation, however, check the selection range. This will prevent you from accidentally moving the main item as well.
How to Add Another Main Item After Subitems
This is a very common situation.
For example, you have:
1. Writer
1.1 Text
1.2 Tables
1.3 Images
Now you want to create:
2. Calc
After the last subitem, press Enter to create the next item.
Then move it up one level, for example by using Shift + Tab.
Writer should adjust its position and numbering to the main level.
What to Do If Numbering Does Not Continue
Sometimes, after changing levels, the numbering may not look as expected.
First, check whether the item actually belongs to the same list.
If Writer treats the section as a new list, it may restart the numbering.
In this case, use the function for continuing previous numbering.
This means you do not have to correct the numbers manually.
How to Start New Numbering Within a Document
Not every list should continue the previous one.
Suppose one set of instructions has ended and a completely new guide begins several paragraphs later.
In that case, the first item of the new list can start again from 1.
In the numbering settings, you can start a new sequence instead of continuing the previous one.
This keeps the individual sets of instructions independent from one another.
How to End a Multilevel List
After the last item, press Enter.
If Writer creates another empty item, pressing Enter again will end the list in typical situations.
You can then return to a regular paragraph.
However, if you are still on a subordinate level, check the list structure first. Sometimes it is more convenient to return to the main level before ending the numbering.
How to Create Nested Bulleted Lists
The mechanism is similar to numbered lists.
First, create a regular bulleted list:
• LibreOffice Suite
Then add subitems:
○ Writer
○ Calc
○ Impress
You can also create another level:
▪ Writer
○ text formatting
○ tables
○ images
Different symbols help distinguish between levels. However, you should not use too many of them.
How Many List Levels Should You Use?
Technically, you can create complex structures. However, this does not mean that you should always do so.
For an ordinary document, two or three levels are usually enough.
If a list has too many levels, the reader may lose track of the structure.
In this situation, consider whether some of the information should be moved to separate headings.
This will make the document easier to navigate.
Multilevel Lists vs. Document Headings
This is a very important distinction.
A multilevel list is ideal for items, subitems, and short structures.
However, it should not replace proper chapter headings.
If the document has a structure such as:
1 Introduction
1.1 Installation
1.2 Configuration
2 Using the Program
consider using heading styles and the heading numbering mechanism instead of a regular list.
This allows Writer to recognize the document structure more effectively. It also makes it easier to create an automatic table of contents later.
Can You Place a Multilevel List in a Table?
Yes. Lists can also be placed inside table cells.
This is useful, for example, when comparing features.
One cell can contain a main category and several subitems.
However, pay attention to the column width. Each additional level increases the indentation, so a very narrow cell may leave little room for the text.
How to Keep Multiple Lists Looking the Same
If you are creating a large document, manually configuring each list can quickly become inconvenient.
In this situation, it is worth using list styles.
You can open the Styles panel using:
F11
Then go to the category related to list styles.
Styles allow you to define a specific method of numbering, bullet formatting, and level positioning.
Why Are List Styles Important for Nested Lists?
Imagine a set of instructions that is dozens of pages long.
In the first chapter, subitems use one numbering style. In the second, you accidentally use another. In the third, the indentation changes.
The reader will quickly notice the inconsistency.
Styles help prevent this. They allow similar lists to use the same formatting rules.
They also make later modifications easier.
Can You Convert an Existing Regular List into a Multilevel List?
Yes.
You do not have to create everything again.
Suppose you have:
1. Writer
2. Text Formatting
3. Tables
4. Calc
If the items related to formatting and tables should belong to Writer, move them to a lower level.
After changing the structure, it may look like this:
1. Writer
1.1 Text Formatting
1.2 Tables
2. Calc
This allows you to correct the hierarchy even after preparing all the content.
What to Do If Tab Does Not Change the List Level
First, check where the cursor is located.
It should be positioned in an item that belongs to an actual list. If the number or bullet was entered manually as an ordinary character, Writer will not treat the paragraph as part of the list structure.
It is also worth checking the list configuration and how the Tab key behaves in the current context.
If the shortcut does not produce the expected result, you can change the level using commands designed to manage the list structure.
What to Do If All Levels Look the Same
Such a list can still work correctly, but its structure will be less visible.
Open the numbering and bullet settings, then check the configuration of individual levels.
You can use different symbols or different numbering styles.
Also make sure the indentation is appropriate. This will make the difference between the main level and a subitem easier to recognize.
Most Common Mistakes When Creating Multilevel Lists
The first problem is manually moving text with spaces. This only imitates nesting.
Another mistake is entering numbers manually. As a result, Writer cannot properly manage the list structure.
You should also avoid using too many levels. A complex hierarchy may be technically correct but difficult to read.
In addition, each level should have a logical meaning. Do not create a subitem simply because you want to move the text to the right.
How to Create a Clear Multilevel List
First, plan the structure of the information.
Place the main topics on the first level. Move details one level lower. Use another level only when there is genuinely another relationship to represent.
Then make sure the numbering and bullets are consistent.
It is also worth controlling the indentation. If it is too small, the hierarchy becomes difficult to recognize, while excessive indentation takes up space that could be used for the content.
By following these principles, the list will remain clear even when it contains many items.
What Is the Fastest Way to Create Nested Lists?
First, create a regular numbered or bulleted list.
After entering the first item, press Enter. Then create the next item.
If the new item should be a subitem, move it to a lower level. When working with the keyboard, you can often use Tab.
When you want to return to the main level, use Shift + Tab.
This allows you to build a complex structure without manually setting each indent.
Multilevel lists in LibreOffice Writer help show relationships between main items and more detailed information. They make plans, instructions, and documentation much easier to navigate.
When creating subitems, use actual list levels instead of adding spaces. Writer can then automatically manage numbering, bullets, and indentation.
Tab and Shift + Tab are useful for quickly moving between levels. In more complex documents, it is also worth configuring the appearance of individual levels and using list styles.
However, avoid using too many levels of nesting. Two or three clear levels often communicate the structure much better than a complicated hierarchy consisting of many successive subitems.
A well-designed multilevel list should primarily show the relationships between pieces of information. If the reader can immediately recognize what is a main item and what is its subordinate detail, the list is doing its job.