You insert a picture into a document, and it takes up almost the entire page. You try to move it next to the text, but the image jumps to another position. Then, after reducing its size, you discover that the most important detail is too small to see.
These situations occur when preparing instructions, reports, proposals, and documents containing pictures. Fortunately, LibreOffice Writer provides tools that allow you to control the size, position, and visible area of an image.
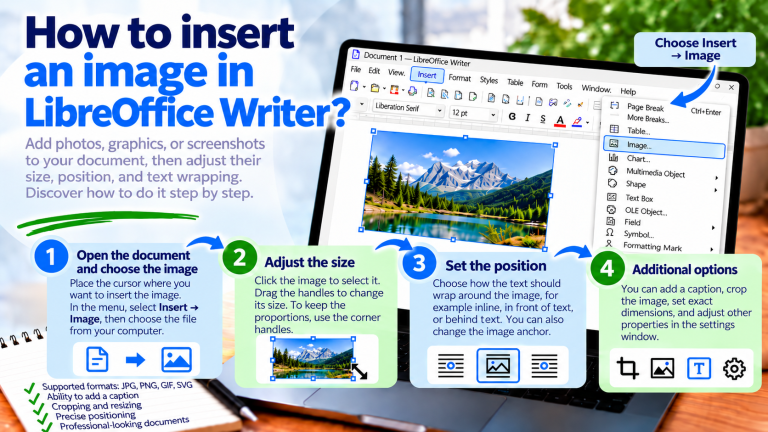
In this guide, you will learn how to resize an image in LibreOffice Writer, maintain its proportions, move a picture to a selected position, and crop unnecessary areas. You will also learn about anchoring and text wrapping settings, which are often responsible for problems with image positioning.
How to Resize an Image in LibreOffice Writer
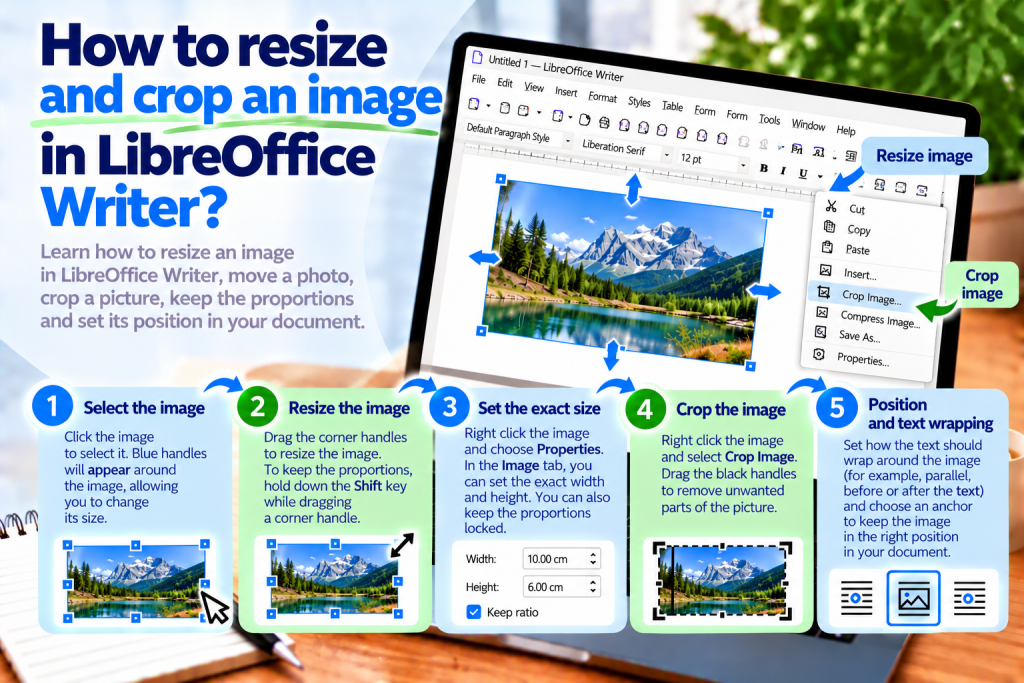
The simplest method is to drag the handles displayed around a selected picture.
First, open the document containing the image. Then left-click the image.
Handles will appear around the picture, allowing you to change its size.
Now follow these steps:
- Click the image to select it.
- Position the mouse pointer over one of the corner handles.
- Hold down the left mouse button.
- Drag the handle to enlarge or reduce the image.
- Release the button when you reach the desired size.
This allows you to quickly fit the picture to the text width or available space on the page.
How to Reduce an Image Without Changing Its Proportions
When resizing an image, it is easy to accidentally stretch it.
For example, a photograph showing a round object may look like an ellipse after incorrect scaling.
Therefore, it is worth maintaining the original width-to-height ratio.
The most reliable solution is to open the image properties and enable the option to maintain the aspect ratio.
Then change the width or height.
Writer will adjust the other dimension according to the selected proportions.
This ensures that the picture retains its natural appearance.
How to Set the Exact Size of an Image
Dragging handles works well for quick editing. However, when preparing a professional document, you sometimes need exact dimensions.
Suppose all screenshots should be 12 cm wide.
Instead of adjusting them manually, you can enter a specific value.
To do this:
- Select the image.
- Right-click it.
- Select Properties.
- Open the Position and Size tab.
- Enter the desired width.
- Check the option to maintain the aspect ratio.
- Confirm the changes.
As a result, you will get an image with precisely defined dimensions.
What’s more, you can apply the same width to additional images.
How to Change the Width of an Image Without Changing Its Height
Writer allows you to control both dimensions independently. However, remember that doing so may distort the image.
If you disable the option to maintain the aspect ratio, you can change only the width.
For example, an image measuring 10 cm by 5 cm can be stretched to a width of 15 cm without increasing its height.
As a result, its contents will become wider.
Therefore, this solution should only be used when you deliberately want to change the image’s proportions.
For photographs, logos, and screenshots, it is better to maintain the original aspect ratio.
How to Fit an Image to the Page Width
A large picture may extend beyond the document margins.
In this situation, first check the width of the available text area.
Then open the image properties and reduce its width.
Remember that an A4 page is 21 cm wide, but part of this space is occupied by margins.
For example, with 2 cm margins on each side, the available width is 17 cm.
Therefore, an image that is 19 cm wide will not fit within this text area without changing the layout.
It is also worth leaving a little extra space, especially if the document will be printed.
How to Resize Multiple Images
If a document contains many illustrations, it is best to establish a consistent formatting approach.
For example, all screenshots can be 12 cm wide, while smaller icons can be 3 cm wide.
Then set the appropriate dimensions in the properties of each image.
This will help the document maintain a consistent appearance.
However, remember that images with different aspect ratios may have different heights despite having the same width.
Therefore, you should not force them to have the same height at the expense of distorting their contents.
How to Move an Image in LibreOffice Writer
Moving a picture depends on its anchoring.
If the image is a freely positioned object, you can try moving it with the mouse.
First, select the image. Then position the pointer over it and drag the image to a new location.
When you release the button, Writer will attempt to place it according to the current positioning settings.
However, not every image can be moved in the same way.
Therefore, if the image does not behave as expected, check its anchoring.
Why Won’t an Image Move?
The most common cause is the As Character setting.
In this mode, Writer treats the image similarly to a text character. This means its position depends on the paragraph and text layout.
Therefore, freely dragging it may not work as it would with an ordinary graphic object.
If you want to move the picture more independently of the text, consider a different anchoring option.
For example, you can anchor the image to a paragraph and then adjust its position.
What Does Image Anchoring Mean?
Anchoring determines which element of the document an image is associated with.
Writer provides several anchoring options, including:
- To Page.
- To Paragraph.
- To Character.
- As Character.
Each option affects how the image behaves during editing.
For example, an image anchored to a paragraph is associated with a specific section of text.
The As Character setting, on the other hand, makes the image part of the text layout.
This allows you to choose the anchoring method that best suits the document.
How to Change Image Anchoring
First, right-click the image.
Then find the Anchor command.
Choose the option that matches your intended layout.
If you are creating instructions with illustrations placed between paragraphs, the As Character setting often works well.
For more complex picture arrangements, however, consider anchoring the image to a paragraph.
After making the change, check whether the image behaves correctly when you add more text.
How to Move an Image to the Left or Right
If the image is set as a character, you can use paragraph alignment.
To move the image to the left, place the cursor in the paragraph containing the image and press:
Ctrl + L
To align it to the right, use:
Ctrl + R
This allows the image to be aligned similarly to ordinary text.
However, if the image uses a different anchoring method, use the positioning settings.
How to Center an Image
Centered illustrations often look best in instructions and reports.
If the image is anchored as a character, place the cursor in the appropriate paragraph.
Then press:
Ctrl + E
Writer will center the paragraph contents.
This places the picture in the middle of the available text area.
For freely positioned images, you can set the appropriate alignment in the image properties.
How to Set the Exact Position of an Image
Dragging with the mouse does not always provide enough precision.
If you are preparing a document with a specific layout, it is worth using the position settings.
Right-click the image and open Properties.
Then go to the Position and Size tab.
Here, you can specify how the image should be positioned relative to the available reference elements.
For example, an image can be positioned relative to the text area, paragraph, or page, depending on the selected anchoring method.
This makes it easier to maintain a consistent document layout.
How to Place an Image Next to Text
A picture does not always need to occupy a separate line.
Sometimes it is better to place it to one side, leaving room for a description.
In this case, use the text wrapping settings.
First, select the image. Then open its properties and go to the Wrap tab.
Choose the arrangement that matches your intended layout.
This allows text to appear next to the image instead of only above and below it.
How to Set the Spacing Between an Image and Text
When text touches a picture directly, the document may look unattractive.
Therefore, it is worth leaving a small gap.
In the text wrapping settings, you will find parameters that determine the distance between the image and the surrounding content.
You can adjust the spacing on individual sides.
For example, setting a small distance from the text will prevent the paragraph from touching the edge of the picture.
As a result, the entire document will become easier to read.
How to Crop an Image in LibreOffice Writer
Cropping allows you to hide unnecessary parts of a picture without changing its most important content.
Suppose you have taken a screenshot of the entire screen, but you only want to show one program window in your instructions.
Instead of inserting the full screen, you can crop the image.
First, select the image. Then use the Crop tool available in the image tools.
After activating cropping mode, adjust the visible area.
This allows you to keep only the section that matters to the reader.
How to Crop an Image Using Properties
If you need greater precision, you can use the image properties window.
Follow these steps:
- Right-click the image.
- Open Properties.
- Go to the Crop tab.
- Set the cropping values for the appropriate edges.
- Check the preview and result.
- Confirm the settings.
Writer allows you to specify how much of the image should be hidden.
This lets you achieve a more precise result than dragging handles.
How to Crop an Image from Only One Side
You do not always need to remove parts from every edge.
Sometimes the only problem is empty space on the left side of the picture.
In this case, open the cropping settings and change the value for the left edge.
You can leave the remaining values unchanged.
This will hide only the unnecessary area.
You can do the same with the top, bottom, or right side of the image.
How to Crop a Screenshot to a Specific Window
This is a very useful feature when creating guides.
Suppose a screenshot shows the entire desktop, but you are only interested in the LibreOffice settings window.
First, insert the image into the document.
Then enable cropping and remove the visible parts of the desktop.
Leave only the program window and the elements needed to perform the described action.
This allows the reader to immediately notice the most important part.
In addition, the cropped screenshot may take up less space on the page.
Does Cropping Permanently Remove Parts of an Image?
You should not assume that cropping permanently removes image data.
In Writer, cropping may only hide parts of the image.
This means the invisible portion may still be stored in the document.
Therefore, if you want to permanently remove confidential information from a picture, do not rely on cropping alone.
In this situation, prepare a properly modified image file before inserting it into the document.
How to Undo Image Cropping
If the result does not look right, you can undo the last operation.
Use:
Ctrl + Z
Writer will restore the previous state, provided the operation is still available in the undo history.
You can also reopen the cropping settings and adjust the values.
If you want to restore the entire visible area, remove the applied cropping values.
What Is the Difference Between Cropping and Resizing?
These two operations are often confused.
Resizing changes the width and height of the displayed image.
Cropping, on the other hand, changes the area of the image that remains visible.
Suppose you have a photograph showing a desk, a monitor, and a window.
Reducing its size will make the entire photograph smaller.
Cropping, however, will allow you to keep only the monitor visible.
Therefore, before performing the operation, consider whether you want to reduce the entire image or hide unnecessary parts.
Does Cropping Reduce Image Quality?
Simply hiding parts of an image does not necessarily reduce its quality.
However, after cropping, you may often need to enlarge the remaining area.
If you enlarge a small section of a photograph, it may become less sharp.
Therefore, it is best to use images with an appropriate resolution.
For screenshots, pay particular attention to the readability of the text.
How to Enlarge a Cropped Section of an Image
After cropping an image, you can resize it.
First, remove the unnecessary areas. Then adjust the width and height of the visible section.
This allows an important element to occupy a larger part of the page.
However, it is worth maintaining the aspect ratio so that the image does not appear stretched.
If the details are still blurry, it is better to take a new screenshot at a higher resolution.
How to Keep Pictures the Same Size in a Document
Visual consistency is particularly important when using a large number of illustrations.
Suppose you are preparing instructions containing ten screenshots.
If each one has a different width, the document may look chaotic.
Therefore, it is worth establishing a single formatting rule.
For example, all large screenshots can be 12 cm wide.
Smaller illustrations, on the other hand, can be 6 cm wide.
This will make the document more organized.
How to Place an Image in a Table
Sometimes you want to place several pictures next to each other.
In this situation, you can use a table.
First, create a table with the appropriate number of columns. Then insert images into individual cells.
This makes it easier to maintain their arrangement.
If you do not want to display the table lines, you can adjust the borders accordingly.
This is a useful solution for product catalogs, comparisons, and simple galleries.
Why Does an Image Move When You Add Text?
The problem is usually caused by anchoring and text wrapping settings.
If an image is associated with a paragraph, changes to the document may affect its position.
Therefore, it is worth carefully choosing the anchoring method.
For instructions in which a picture should appear between paragraphs, the As Character setting often works well.
For more complex layouts, however, you may need a different solution.
Why Does an Image Extend Beyond the Margin?
First, check the width of the image.
If it is larger than the available text area, it may extend beyond the margin.
Then reduce its dimensions or change its position.
It is also worth checking the anchoring because the positioning method may affect where the image appears.
This will help you avoid problems when printing or exporting the document to PDF.
Why Does an Image Look Bad After Resizing?
The problem is usually caused by losing the original aspect ratio or enlarging the image too much.
If a picture has been stretched in only one direction, its contents may look unnatural.
Therefore, check the option to maintain the aspect ratio.
If the image is blurry, however, the problem may be caused by insufficient resolution in the source file.
In this case, it is best to use a higher-quality image.
Why Can’t I Crop an Image?
First, check whether the selected element is actually a raster image or a supported graphic object.
Some objects, shapes, and drawing elements use different editing tools.
Therefore, the options available for a picture may differ from those for an ordinary shape.
If the cropping function is unavailable, check the type of selected object and the available tools.
How to Prepare Images for PDF Export
Before saving the document, it is worth checking all images.
First, make sure the images fit within the page area.
Then check their proportions and readability.
Also pay attention to text wrapping and spacing.
After finishing your edits, select:
File → Export As → Export as PDF
Then open the finished file and check the arrangement of the illustrations.
This will help you avoid sending a document with accidentally displaced pictures.
Most Common Mistakes When Resizing and Cropping Images
The first mistake is changing the width and height without maintaining the aspect ratio. As a result, the image may appear stretched.
Another problem is trying to adjust the position using spaces and empty paragraphs. Instead, use anchoring and positioning settings.
You should also avoid excessively enlarging small pictures because this may reduce their readability.
When cropping, remember that the hidden part of an image may not be permanently removed from the document.
What Is the Fastest Way to Resize, Move, or Crop an Image?
If you want to resize an image, select it and drag a corner handle.
When you need exact dimensions, open Properties → Position and Size.
To move a picture, check its anchoring and adjust its position.
To hide unnecessary areas, use the Crop tool or the cropping tab in the image properties.
This allows you to make most basic changes without using an additional image editor.
Resizing an image in LibreOffice Writer does not require specialized tools. You can use the mouse handles or precisely specify the width and height in the image properties.
Moving pictures, however, depends on anchoring and positioning settings. Therefore, if an image refuses to stay in the selected location, check these parameters instead of adding spaces or empty paragraphs.
Cropping allows you to hide unnecessary parts of a picture and focus the reader’s attention on the most important details. However, remember that it does not always mean permanently removing image data.
With proper scaling, positioning, and cropping, you can create attractive instructions, reports, and documents containing pictures.
The most important things are maintaining proportions, readability, and a consistent layout. As a result, images will complement the document’s content instead of making later editing more difficult.